Kubernetes を調査しようかなということで minikube を使ったセットアップを試してみる 環境は Ubuntu 16.04 の Note PC minikube は single node の Kubernetes を 1 コマンドでセットアップすることができるツールです。Windows でも使えます。 KVM または VirtualBox で仮想サーバをたてて、そこで Kubernetes 環境が構築されます。
kubectl のインストール
Kubernetes の操作には kubectl が必要なのでまずはこれをインストール
| |
Mac なら linux/amd64 の部分が darwin/amd64 ですかね GitHub のリリースページからまるっとダウンロードした中からも取り出せますが 1GB もダウンロードしないといけない kubectl だけ取り出すならこんな感じ
| |
minikube のインストール
minikube は GitHub の release ページからダウンロード https://github.com/kubernetes/minikube/releases
| |
$ minikube version
minikube version: v0.11.0
Kubernetes をセットアップ
Linux なので KVM が使えるのですが、Vagrant などで VirtualBox を使っているし、KVM 用のパッケージはまだインストールしてなかったので他の環境でも使えるしということで VirtualBox を使うことにしました。 使いたいバージョンを選んでセットアップすることができます。今回は 1.4.0 を使ってみました。
$ minikube get-k8s-versions
The following Kubernetes versions are available:
	- v1.5.0-alpha.0
	- v1.4.0
	- v1.3.7
	- v1.3.6
	- v1.3.5
	- v1.3.4
	- v1.3.3
	- v1.3.0
次のコマンドだけで Kubernetes がセットアップできます
$ minikube start
Starting local Kubernetes cluster...
Kubectl is now configured to use the cluster.
$ minikube status
minikubeVM: Running
localkube: RunningVM の CPU の数やメモリサイズ、ディスクサイズなども指定できます
$ minikube start --help
Starts a local kubernetes cluster using Virtualbox. This command
assumes you already have Virtualbox installed.

Usage:
  minikube start [flags]

Flags:
      --container-runtime string        The container runtime to be used
      --cpus int                        Number of CPUs allocated to the minikube VM (default 1)
      --disk-size string                Disk size allocated to the minikube VM (format: [], where unit = b, k, m or g) (default "20g")
      --docker-env stringSlice          Environment variables to pass to the Docker daemon. (format: key=value)
      --extra-config ExtraOption        A set of key=value pairs that describe configuration that may be passed to different components.
		The key should be '.' separated, and the first part before the dot is the component to apply the configuration to.
		Valid components are: kubelet, apiserver, controller-manager, etcd, proxy, scheduler.
      --host-only-cidr string           The CIDR to be used for the minikube VM (only supported with Virtualbox driver) (default "192.168.99.1/24")
      --insecure-registry stringSlice   Insecure Docker registries to pass to the Docker daemon
      --iso-url string                  Location of the minikube iso (default "https://storage.googleapis.com/minikube/minikube-0.7.iso")
      --kubernetes-version string       The kubernetes version that the minikube VM will (ex: v1.2.3)
 OR a URI which contains a localkube binary (ex: https://storage.googleapis.com/minikube/k8sReleases/v1.3.0/localkube-linux-amd64) (default "v1.4.0+$Format:%h$")
      --memory int                      Amount of RAM allocated to the minikube VM (default 1024)
      --network-plugin string           The name of the network plugin
      --registry-mirror stringSlice     Registry mirrors to pass to the Docker daemon
      --vm-driver string                VM driver is one of: [virtualbox kvm] (default "virtualbox")

Global Flags:
      --alsologtostderr                  log to standard error as well as files
      --log_backtrace_at traceLocation   when logging hits line file:N, emit a stack trace (default :0)
      --log_dir string                   If non-empty, write log files in this directory
      --logtostderr                      log to standard error instead of files
      --show-libmachine-logs             Whether or not to show logs from libmachine.
      --stderrthreshold severity         logs at or above this threshold go to stderr (default 2)
  -v, --v Level                          log level for V logs
      --vmodule moduleSpec               comma-separated list of pattern=N settings for file-filtered logging
vagrant や docker-machine の様に ssh で Kubernetes のサーバーにログインできます。
$ minikube ssh
                        ##         .
                  ## ## ##        ==
               ## ## ## ## ##    ===
           /"""""""""""""""""\___/ ===
      ~~~ {~~ ~~~~ ~~~ ~~~~ ~~~ ~ /  ===- ~~~
           \______ o           __/
             \    \         __/
              \____\_______/
 _                 _   ____     _            _
| |__   ___   ___ | |_|___ \ __| | ___   ___| | _____ _ __
| '_ \ / _ \ / _ \| __| __) / _` |/ _ \ / __| |/ / _ \ '__|
| |_) | (_) | (_) | |_ / __/ (_| | (_) | (__|   <  __/ |
|_.__/ \___/ \___/ \__|_____\__,_|\___/ \___|_|\_\___|_|
Boot2Docker version 1.11.1, build master : 901340f - Fri Jul  1 22:52:19 UTC 2016
Docker version 1.11.1, build 5604cbe
docker@minikube:~$
Dashboard
Kubernetes の Dashboard も使えます minikube dashboard コマンドを実行すればブラウザで開いてくれます
$ minikube dashboard
Opening kubernetes dashboard in default browser...
既存のブラウザ セッションに新しいウィンドウが作成されました。
直接ローカルのブラウザで開けない場合は次のようにすればアクセスするための URL が表示されます
$ minikube dashboard --url=true
http://192.168.99.100:30000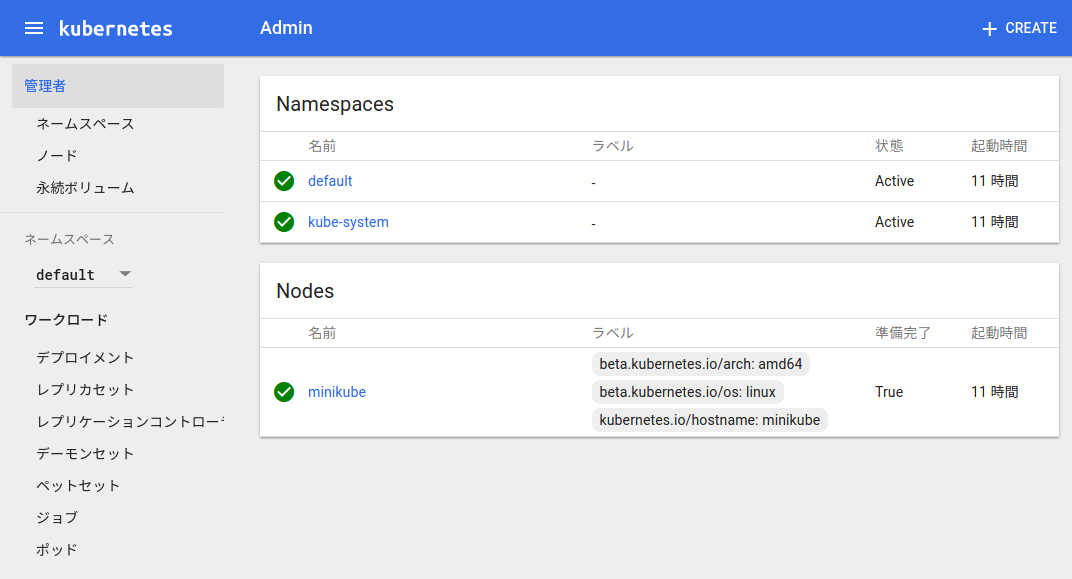
Kubernetes Dashboard
kubectl からアクセスしてみる
kubectl でアクセスできることを確認してみます
$ kubectl cluster-info
Kubernetes master is running at https://192.168.99.100:8443
kubernetes-dashboard is running at https://192.168.99.100:8443/api/v1/proxy/namespaces/kube-system/services/kubernetes-dashboard

To further debug and diagnose cluster problems, use 'kubectl cluster-info dump'.
$ kubectl version
Client Version: version.Info{Major:"1", Minor:"4", GitVersion:"v1.4.0", GitCommit:"a16c0a7f71a6f93c7e0f222d961f4675cd97a46b", GitTreeState:"clean", BuildDate:"2016-09-26T18:16:57Z", GoVersion:"go1.6.3", Compiler:"gc", Platform:"linux/amd64"}
Server Version: version.Info{Major:"1", Minor:"4", GitVersion:"v1.4.0", GitCommit:"a16c0a7f71a6f93c7e0f222d961f4675cd97a46b", GitTreeState:"dirty", BuildDate:"1970-01-01T00:00:00Z", GoVersion:"go1.7.1", Compiler:"gc", Platform:"linux/amd64"}$ kubectl get nodes
NAME STATUS AGE
minikube Ready 10h$ kubectl get pods --all-namespaces
NAMESPACE NAME READY STATUS RESTARTS AGE
kube-system kube-addon-manager-minikube 1/1 Running 0 10h
kube-system kubernetes-dashboard-6ommh 1/1 Running 0 10h$ kubectl get namespaces
NAME STATUS AGE
default Active 10h
kube-system Active 10hはて?特に何も設定してないのにどうして kubectl は接続先を知っているのでしょう? どうやら minikube は ~/.kube/config も設定してくれているようです
$ cat ~/.kube/config
apiVersion: v1
clusters:
- cluster:
    certificate-authority: /home/ytera/.minikube/ca.crt
    server: https://192.168.99.100:8443
  name: minikube
contexts:
- context:
    cluster: minikube
    user: minikube
  name: minikube
current-context: minikube
kind: Config
preferences: {}
users:
- name: minikube
  user:
    client-certificate: /home/ytera/.minikube/apiserver.crt
    client-key: /home/ytera/.minikube/apiserver.key
Kubernetes の Docker daemon にアクセスしてみる
docker-machine のように次のようにすることで docker コマンドで直接 Kubernetes の Docker daemon にアクセスできます
$ minikube docker-env
export DOCKER_TLS_VERIFY="1"
export DOCKER_HOST="tcp://192.168.99.100:2376"
export DOCKER_CERT_PATH="/home/ytera/.minikube/certs"
export DOCKER_API_VERSION="1.23"
# Run this command to configure your shell:
# eval $(minikube docker-env)
$ eval $(minikube docker-env)
$ docker ps
CONTAINER ID IMAGE COMMAND CREATED STATUS PORTS NAMES
4590a8c95cc3 gcr.io/google_containers/kubernetes-dashboard-amd64:v1.4.0 "/dashboard --port=90" 10 hours ago Up 10 hours k8s_kubernetes-dashboard.17d7dac9_kubernetes-dashboard-6ommh_kube-system_af24e8e2-9274-11e6-b79f-9e8b7626e0db_d484a526
3a3e728bfb83 gcr.io/google_containers/pause-amd64:3.0 "/pause" 10 hours ago Up 10 hours k8s_POD.2225036b_kubernetes-dashboard-6ommh_kube-system_af24e8e2-9274-11e6-b79f-9e8b7626e0db_7c3eb331
919ed2887873 gcr.io/google-containers/kube-addon-manager-amd64:v2 "/opt/kube-addons.sh" 10 hours ago Up 10 hours k8s_kube-addon-manager.a1c58ca2_kube-addon-manager-minikube_kube-system_3e8322eb546e1d90d2fb7cac24d6d6a2_6ddcb7b8
80fe85c54a84 gcr.io/google_containers/pause-amd64:3.0 "/pause" 10 hours ago Up 10 hoursKubernetes でコンテナを起動してみる
YAML を書かないでコンテナを起動することもできるようだ http://kubernetes.io/docs/user-guide/simple-nginx/ nginx を2つ起動させる
$ kubectl run my-nginx --image=nginx --replicas=2 --port=80
deployment "my-nginx" created
docker pull など起動の準備中
$ kubectl get pods
NAME                       READY     STATUS              RESTARTS   AGE
my-nginx-379829228-9tr21   0/1       ContainerCreating   0          9s
my-nginx-379829228-s5d06   0/1       ContainerCreating   0          9s
1つ目が起動
$ kubectl get pods
NAME                       READY     STATUS              RESTARTS   AGE
my-nginx-379829228-9tr21   1/1       Running             0          47s
my-nginx-379829228-s5d06   0/1       ContainerCreating   0          47s
2つ目も起動
$ kubectl get pods
NAME                       READY     STATUS    RESTARTS   AGE
my-nginx-379829228-9tr21   1/1       Running   0          1m
my-nginx-379829228-s5d06   1/1       Running   0          1m
deployments というものになるようだ
$ kubectl get deployments
NAME       DESIRED   CURRENT   UP-TO-DATE   AVAILABLE   AGE
my-nginx   2         2         2            2           3m
削除
$ kubectl delete deployment my-nginx
deployment "my-nginx" deleted
Service にしてみる
さっきと同じように2つの nginx を起動させる
$ kubectl run my-nginx --image=nginx --replicas=2 --port=80
deployment "my-nginx" created
起動中
$ kubectl get pods
NAME                       READY     STATUS              RESTARTS   AGE
my-nginx-379829228-08jvp   1/1       Running             0          6s
my-nginx-379829228-9wudu   0/1       ContainerCreating   0          6s
$ kubectl get deployments
NAME DESIRED CURRENT UP-TO-DATE AVAILABLE AGE
my-nginx 2 2 2 2 9sdeployment を LoadBalancer を使って expose する
$ kubectl expose deployment my-nginx --port=80 --type=LoadBalancer
service "my-nginx" exposed
$ kubectl get deployments
NAME DESIRED CURRENT UP-TO-DATE AVAILABLE AGE
my-nginx 2 2 2 2 37sService ができた
$ kubectl get services
NAME         CLUSTER-IP   EXTERNAL-IP   PORT(S)   AGE
kubernetes   10.0.0.1     443/TCP   11h
my-nginx     10.0.0.88    80/TCP    14s
しかし、この IP アドレスではアクセスできない、EXTERNAL-IP が pending だからここをなんとかする必要があるようだ 今後調査
$ kubectl expose --help
Expose a resource as a new Kubernetes service.

Looks up a deployment, service, replica set, replication controller or pod by name and uses the selector
for that resource as the selector for a new service on the specified port. A deployment or replica set
will be exposed as a service only if its selector is convertible to a selector that service supports,
i.e. when the selector contains only the matchLabels component. Note that if no port is specified via
--port and the exposed resource has multiple ports, all will be re-used by the new service. Also if no
labels are specified, the new service will re-use the labels from the resource it exposes.

Possible resources include (case insensitive):
pod (po), service (svc), replicationcontroller (rc),
deployment (deploy), replicaset (rs)

Examples:
  # Create a service for a replicated nginx, which serves on port 80 and connects to the containers on port 8000.
  kubectl expose rc nginx --port=80 --target-port=8000

  # Create a service for a replication controller identified by type and name specified in "nginx-controller.yaml", which serves on port 80 and connects to the containers on port 8000.
  kubectl expose -f nginx-controller.yaml --port=80 --target-port=8000

  # Create a service for a pod valid-pod, which serves on port 444 with the name "frontend"
  kubectl expose pod valid-pod --port=444 --name=frontend

  # Create a second service based on the above service, exposing the container port 8443 as port 443 with the name "nginx-https"
  kubectl expose service nginx --port=443 --target-port=8443 --name=nginx-https

  # Create a service for a replicated streaming application on port 4100 balancing UDP traffic and named 'video-stream'.
  kubectl expose rc streamer --port=4100 --protocol=udp --name=video-stream

  # Create a service for a replicated nginx using replica set, which serves on port 80 and connects to the containers on port 8000.
  kubectl expose rs nginx --port=80 --target-port=8000

  # Create a service for an nginx deployment, which serves on port 80 and connects to the containers on port 8000.
  kubectl expose deployment nginx --port=80 --target-port=8000

Options:
      --cluster-ip='': ClusterIP to be assigned to the service. Leave empty to auto-allocate, or set to 'None' to create a headless service.
      --container-port='': Synonym for --target-port
      --create-external-load-balancer=false: If true, create an external load balancer for this service (trumped by --type). Implementation is cloud provider dependent. Default is 'false'.
      --dry-run=false: If true, only print the object that would be sent, without sending it.
      --external-ip='': Additional external IP address (not managed by Kubernetes) to accept for the service. If this IP is routed to a node, the service can be accessed by this IP in addition to its generated service IP.
  -f, --filename=[]: Filename, directory, or URL to a file identifying the resource to expose a service
      --generator='service/v2': The name of the API generator to use. There are 2 generators: 'service/v1' and 'service/v2'. The only difference between them is that service port in v1 is named 'default', while it is left unnamed in v2. Default is 'service/v2'.
  -l, --labels='': Labels to apply to the service created by this call.
      --load-balancer-ip='': IP to assign to the Load Balancer. If empty, an ephemeral IP will be created and used (cloud-provider specific).
      --name='': The name for the newly created object.
      --no-headers=false: When using the default or custom-column output format, don't print headers.
  -o, --output='': Output format. One of: json|yaml|wide|name|custom-columns=...|custom-columns-file=...|go-template=...|go-template-file=...|jsonpath=...|jsonpath-file=... See custom columns [http://kubernetes.io/docs/user-guide/kubectl-overview/#custom-columns], golang template [http://golang.org/pkg/text/template/#pkg-overview] and jsonpath template [http://kubernetes.io/docs/user-guide/jsonpath].
      --output-version='': Output the formatted object with the given group version (for ex: 'extensions/v1beta1').
      --overrides='': An inline JSON override for the generated object. If this is non-empty, it is used to override the generated object. Requires that the object supply a valid apiVersion field.
      --port='': The port that the service should serve on. Copied from the resource being exposed, if unspecified
      --protocol='': The network protocol for the service to be created. Default is 'TCP'.
      --record=false: Record current kubectl command in the resource annotation. If set to false, do not record the command. If set to true, record the command. If not set, default to updating the existing annotation value only if one already exists.
  -R, --recursive=false: Process the directory used in -f, --filename recursively. Useful when you want to manage related manifests organized within the same directory.
      --save-config=false: If true, the configuration of current object will be saved in its annotation. This is useful when you want to perform kubectl apply on this object in the future.
      --selector='': A label selector to use for this service. Only equality-based selector requirements are supported. If empty (the default) infer the selector from the replication controller or replica set.
      --session-affinity='': If non-empty, set the session affinity for the service to this; legal values: 'None', 'ClientIP'
  -a, --show-all=false: When printing, show all resources (default hide terminated pods.)
      --show-labels=false: When printing, show all labels as the last column (default hide labels column)
      --sort-by='': If non-empty, sort list types using this field specification.  The field specification is expressed as a JSONPath expression (e.g. '{.metadata.name}'). The field in the API resource specified by this JSONPath expression must be an integer or a string.
      --target-port='': Name or number for the port on the container that the service should direct traffic to. Optional.
      --template='': Template string or path to template file to use when -o=go-template, -o=go-template-file. The template format is golang templates [http://golang.org/pkg/text/template/#pkg-overview].
      --type='': Type for this service: ClusterIP, NodePort, or LoadBalancer. Default is 'ClusterIP'.

Usage:
  kubectl expose (-f FILENAME | TYPE NAME) [--port=port] [--protocol=TCP|UDP] [--target-port=number-or-name] [--name=name] [--external-ip=external-ip-of-service] [--type=type] [options]

Use "kubectl options" for a list of global command-line options (applies to all commands).
作った Kubernetes 環境の削除
不要になったら削除する(stop しなくても delete できるし速い)
$ minikube stop
Stopping local Kubernetes cluster...
Machine stopped.
$ minikube status
minikubeVM: Stopped
localkube: N/A$ minikube delete
Deleting local Kubernetes cluster...
Machine deleted.$ minikube status
minikubeVM: Does Not Exist
localkube: N/AKubernetes の調査を続けたい
続き minikube を試す – その2、 minikube を試す – その3 を書いた


 amazon.co.jp